Self-Calibrating Thermometers for Use in Medical Autoclaves

A temperature sensor in a medical autoclave is typically calibrated once a year. If the sensor proves to be inaccurate, all batches produced since the last calibration must be evaluated. Endress+Hauser has developed a self-calibrating sensor that automatically verifies its accuracy during each sterilization batch. This article describes a case study at the Merck Healthcare KGaA sterile facility in Darmstadt, Germany, using the new sensor in a steam sterilizer and corresponding risk and benefit considerations for possible routine use of this type of sensor in pharmaceutical applications.
Pharmaceuticals intended for injection into the human body or for implantation must be sterile. It is common knowledge that sterility is always a probabilistic attribute, not absolute. Sterility of a product means the theoretical probability of a nonsterile unit (PNSU) must be less than 10-6. To guarantee this level of sterility assurance, the materials may undergo different types of sterilization processes. According to EMA1 and US Pharmacopeia2 guidelines, steam sterilization is the preferred method when the material to be sterilized is capable of withstanding these high temperatures.
Typical sterilization processes employ temperatures around 121°C. The steam sterilization process is conducted as follows: Air is removed from the autoclave during consecutive prevacuum stages. A supply of saturated steam is then introduced into the process chamber under pressure to heat the products to approximately 123°C for more than 15 minutes (to always be above the desired 121°C). If temperatures in the sterilization process are not verified to be accurately measured, it cannot be determined whether the autoclave functions as it should. For that reason, calibration of temperature sensors is essential.
Mechanical impact on the temperature sensor can significantly affect its measuring accuracy. For example, the thermometer could be mechanically damaged when goods are pushed onto the carriage if the products slip during loading or unloading and remain suspended on the slightly protruding temperature sensor. Regular, automatic calibration for each batch (i.e., each time goods are loaded/unloaded) would eliminate the risk of this error remaining undetected for a long period.
Self-Calibrating Sensor Functionality
The sensor in this study (specifically, an iTHERM TrustSens TM371) employs a self-calibration method that uses the Curie temperature (Tc) of a reference material as the built-in temperature reference. The reference material in the sensor is not subject to change due to its properties and because this fixpoint cell is protected inside the sensor itself. Because the Tc of the reference material is a constant, it is used as the calibration reference.


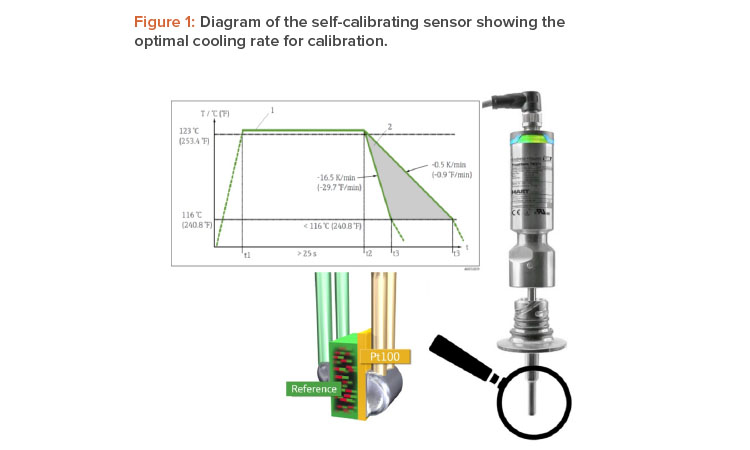
Once the reference material reaches the Tc, the material undergoes a phase change associated with a change in its electrical properties (capacity). The self-calibrating sensor’s electronics unit detects this change in properties automatically and compares the temperature measured by a Pt100 sensor—a resistance temperature detector with a resistance (R) of 100 ohms at 0°C—with the known Tc (Figure 1).
Self-calibration is performed automatically when the process temperature (Tp) drops below the nominal Tc of the device. A flashing green LED indicates that the self-calibration process is in progress. Once complete, the thermometer’s electronics unit saves the calibration results.
This in-line self-calibration makes it possible to continuously and repeatedly monitor changes to the properties of the Pt100 sensor and the electronics unit. Because the inline calibration is performed under real ambient or process conditions (e.g., heating of the electronics unit), the result is more closely aligned with actual function than a sensor calibration performed under laboratory conditions.
Self-calibration is verified directly in the thermometer’s terminal sensor head, which can be accessed from outside of the autoclave. The sensor’s measuring signals (Tp, number of calibrations completed, and the calibration deviation factor) can be transferred directly to the process control system or to a suitable data manager capable of handling data in accordance with data integrity requirements.
A calibration certificate can be automatically created for the self-calibration. The automatically generated calibration certificate can be assigned to every sterilization batch, providing not only documentary proof that the temperature sensor is functioning correctly at that particular time but also evi-dence of the sterility of the batch, given sufficient exposure time. Self-calibration is only completed if the temperature at the sensor also reaches the required sterilization temperature.
Case Study Methods and Findings
The study was conducted using the self-calibrating sensor in a steam sterilizer for a period of about four weeks. During this time, about 80 successful calibrations were performed, which means there were nearly two batches and two calibrations performed each day.
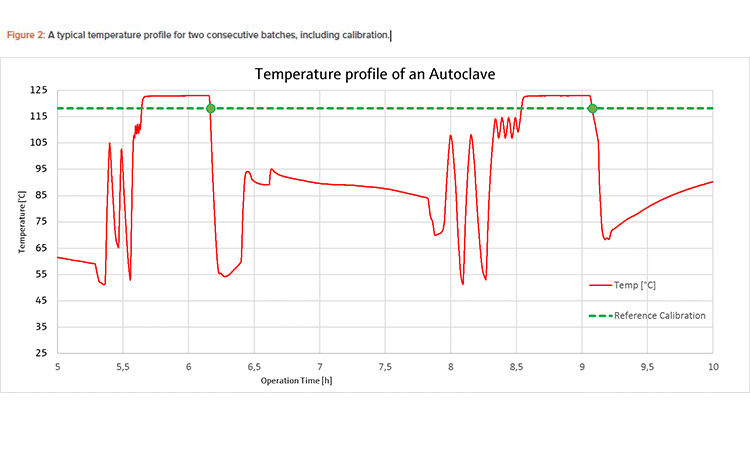
To facilitate the most efficient calibration procedure possible, a slow temperature change in the process is required. As shown in Figure 1, the opti-mum cooling rate for sensor calibration lies between –0.5 K/min and –16.5 K/min. In the case of the steam sterilizer, the calibration point of the self-calibrating sensor was 118°C, which is very close to the Tp of 123°C (see Figure 2); therefore, the automatic calibration was performed in the working range of the desired sterilization process parameters. The temperature elevated through the calibration point of 118°C before the sterilization period and passed it again during the cooling phase after sterilization. The cooling phase was chosen to perform calibration because the temperature change is slower during cooling.


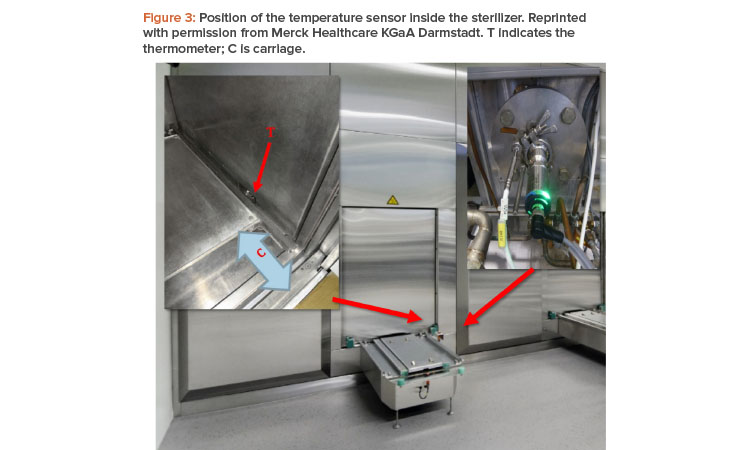
Typically in a steam sterilizer, four to six temperature sensors are installed in different locations and for different purposes. For the study, the self-calibrating sensor was installed at the coldest point in the autoclave, next to an existing sensor to establish a second temperature reference (see Figure 3). During qualification of a sterilizer, temperature mapping is usually carried out to determine the worst positioning of the sensor. In the case study, this position was on the chamber floor near the door.
Upon completion of the study, all data were collected and analyzed. In addition, the probe was calibrated in an accredited calibration lab before and after the study.
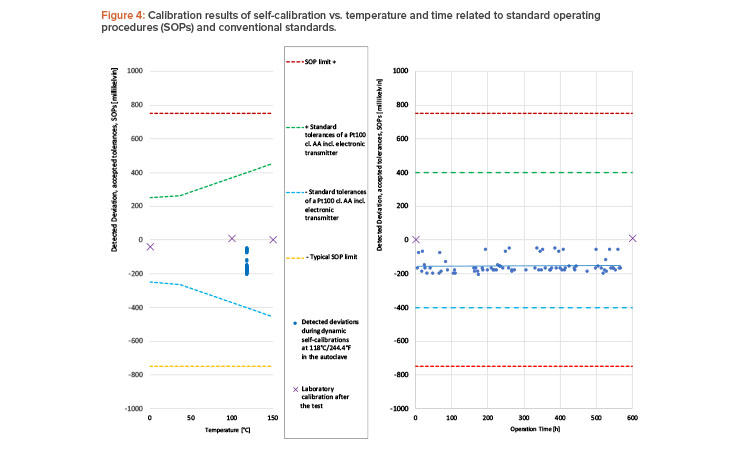
All 80 performed calibrations were successful, and the sensor accuracy was within specified limits (see Figure 4). The 80 calibration results were more accurate than a class AA Pt100 sensor,3 considering that a state-of-the-art digital temperature transmitter adds another uncertainty of ±0.1 K.
Neither the laboratory calibrations before and after the test nor the trendline of the automatic calibrations showed any significant signs of wear or drift. Overall, the study was considered as successful and the sensor was found suitable for sterilization processes.
Increased Product Safety
Our study showed that 80 automatic calibrations can be generated in 600 operation hours. If the critical temperature sensor is working as expected, that would lead to more than 1,100 calibrations per year, not including the manual standard calibration completed periodically (e.g., once a year) according standard operating procedures (SOPs).
Calibration automatically performed with every batch ensures that a damaged thermometer is promptly detected. If the sensor verifies its accuracy and the calibration counter has increased, this indicates that the sterilization was successful. However, if the thermometer gives incorrect results, a warning message is generated by the self-calibrating sensor to immediately indicate a problem, informing the user that the actual product batch might not be fully sterilized and must not be used in further production until a second sterilization cycle has taken place (assuming a second cycle is possible).
In contrast, if normal calibration intervals used in conventional systems (e.g., once a year) are used, a thermometer identified as faulty after a manual calibration cannot be linked to a single batch. Instead, all batches that have been sterilized since the last calibration event have to be incorporated into the deviation investigation. This results in complex root-cause analyzes and, at worst, product recalls, causing considerable expense and damage to the brand.
Traditional vs. Automated Procedures
Notably, traditional calibration conducts testing at three points, whereas the automated procedure employs one-point calibration. These approaches are discussed in the following sections.
Automatic Detection of Sensor Drifts
At T >0°C, the characteristic relationship between the raw signal (resistance) and the temperature of every Pt100 sensor follows the Callendar–van Dusen equation:3
R(T) = R(0) [1 + A × T + B × T2]
where T is measured in °C.
As the name of the Pt100 sensor suggests, the average value R(0) for the sensor is 100 ohm at 0°C; additionally, each self-calibrating thermometer is calibrated during the production process to individually determine the exact values for A, B, and R(0). This delivery state is recorded electronically.
As long the Pt100 sensor is not broken (wire-cut or short-circuited), it follows this equation. But for a “bad” (already drifted) sensor, the value of at least one parameter—R(0), A, or B—has changed. In every case, this will change not only a single temperature but also the complete characteristic curve.
The principle of the one-point automatic calibration is as follows: If a significant deviation between the Pt100 temperature and a reference temperature (which was not 0°C) is detected, the thermometer cannot be accurate at any other temperature, which is also not 0°C. To avoid the risks of undetected drifts, the self-calibrated thermometer will alert operators about the malfunction.
Conversely, the following principle also applies: If the thermometer does not show any significant change in the calibration deviation at the reference point, it is extremely unlikely that the parameters of the equation have changed since the previous calibration. With unchanged values for R(0), A, and B, the thermometer is not only accurate at the calibration point but also measures all other temperatures as accurately as it did previously.
One-Point Self-Calibration Measurement Uncertainty
An analysis conducted by Technische Universität Ilmenau (TU Ilmenau) verifies how a deviation at 118°C affects the entire measuring range.4, 5 Calibration uncertainty at Tc of ±0.35 K was certified by the German technical inspection association TÜV.6 Additionally, TÜV examined the calibration process as part of a study. In particular, they analyzed more than 24,000 calibrations,7 and none of the results analyzed presented a deviation of more than 0.2 K.
Manual Calibration Measurement Uncertainty
To definitively assess the in-process self-calibration procedure, it is advisable to take a closer look at the method commonly used today. To check the accuracy of thermometers for hygienic applications, companies often use dry block calibrators for onsite calibration. Three temperature points are usu-ally used in this process. However, thermometers in this industry usually have quite a short immersion length, as thin pipes or agitators in tanks only offer limited space for installation, and this means that there is often a significant physical distance between the point where a reference thermometer measures the temperature of the calibrator and the position of the sensor to be tested.
To determine the uncertainty of measurement that a calibration of this kind can have, it is advisable to refer to the website of a national accreditation institute, such as Deutsche Akkreditierungsstelle GmbH (DAkkS) in Germany. The directory of accredited bodies also lists numerous companies spe-cialized in performing onsite calibrations.
| Offline Three-Point Manual Calibration |
In-Process One-Point Self-Calibration |
Dynamic Control of Manual Calibration Interval, Triggered by Self-Calibration Results |
|
|---|---|---|---|
| Positives | • Well-known and established method. • No change of SOP documents. |
• No deinstallation or process interruptions are required. • Sensor failures can be detected with every batch. • After detection of thermometer drift, the number of batches produced with a “bad” sensor = 1 (i.e., the product that was in the autoclave). |
• Manual calibration interval can be extended, but an additional calibration will be performed immediately if sensor shows a signifi cant tendency to drift toward a standard operating procedure limit or if detected deviation changes suddenly. • Sensor failures can be detected with every batch. • After detection of thermometer drift, the number of batches produced with a “bad” sensor = 1 (i.e., the product that was in the autoclave). • GMP rules do not prescribe specific calibration intervals (e.g., 12 months), although length of intervals must be justified. |
| Negatives | • No chance to identify sensor drift between two manual calibrations. • Frequent deinstallation with process interruption is required. • After drift detection, the number of batches produced before is unknown. |
• Method is new and must be explained to the inspectors. • SOP documents must be changed. |
• Self-calibration method is new and must be explained to the inspectors. |
| Operating expense |
• No effect. | • High cost-saving effect. | • Medium cost-saving effect. |
We suggest the accredited calibration laboratory TEMEKA GmbH (DAkkS D-K-15024-01-00) in Germany as a benchmark. This company does not produce measuring instruments itself but is specialized in performing calibrations onsite at its customers’ premises. According to the accreditation certificate, the company uses dry block calibrators to check resistance thermometers.8 These specialists reach ±0.75 K as the accredited best measurement capability in the sterilization temperature range. For the industry user, this raises the following questions:
- Can a calibration in the dry block calibrator, which is performed by the user, be more accurate than calibration completed by specialists?
- Was this calibration uncertainty value already included into the standard operating procedure limit for the acceptable deviation of a thermometer?
- Would an in-process one-point calibration provide more accuracy than an offline three-point calibration?
A direct comparison reveals the following: Given its far lower uncertainty of measurement, an in-process single-point calibration (±0.35 K) provides a more reliable statement of conformity than a manual check performed at three points using a dry block calibrator (±0.75 K), particularly for the critical temperature range around the sterilization temperature; this conclusion is especially true if we consider whether calibration is performed manually once a year or automatically for every cleaning process. Table 1 outlines the advantages, disadvantages, and operating expenses identified when comparing in-process one-point calibration and offline three-point calibration as well as a third method in which the manual calibration interval is triggered by self-calibration results.
Enhanced Functionality
Self-calibrating thermometers that are connected to a modern process control system or data manager can provide other data in addition to temperature measurement values. Using the HART protocol, it is also possible to collect “calibration counter” and “last recorded calibration deviation” values.
When these values are continuously queried, an alarm can be generated if the calibration deviation exceeds an established limit. The date and time of the calibration can be checked in a connected system (e.g., process control system or data manager) because the deviation is marked at the moment when the calibration counter increases by 1. With this technology, it is possible to generate an online calibration certificate that can be viewed any time on site or in the network.
Process Safety and Audit Reliability
Standard Operating Procedures and the Change Management Process
Many companies have established standard operating procedures that stipulate a three-point calibration for thermometers. Such standard operating procedures reflect the current state-of-the-art method used to obtain the clearest possible temperature curves for calibration. This approach aligns with expectations of auditors and regulatory authorities because there was no alternative until now.
Notably, the biggest risks for a thermometer in a hygienic system arise from the conventional calibration process itself. Opening the devices, removing the insert, connecting and disconnecting electrical contacts, introducing the thermometer into the calibrator, or transporting the thermometer to the laboratory increases the likelihood of mechanical damage, such as from impact. Furthermore, it is often unclear what is the best way to return the measurement to the exact same measuring position in the process after removing the insert for calibration purposes. With the in-process single-point calibration temperature sensor, these risks are reduced because the sensor stays in one position while being self-calibrated.
Data integrity risks related to the self-calibrated sensor were assessed prior to starting the study, and no potential data integrity breaches could be identified.9,10 All data are stored directly in the sensor, and after each calibration, a PDF calibration report is automatically generated and can be stored in a protected and compliant manner.
Continuous Process Verification
In recent years, the life-cycle model has been adopted in regulatory landscapes all over the world. The shift from the traditional process validation approach to continuous process verification (CPV) is evident in the US, 11 EU, 12 and elsewhere. Because the new calibration technology strongly increases process control, it supports the continuous process verification approach. In-process single-point calibration reduces the risk of a deviation going undetected until the next calibration to the absolute minimum level possible with current technology. This is achieved without compromising calibration accuracy.
In addition, any calibration deviation with the new sensor would only affect a single batch (the one inside the sterilizer at the time of deviation), and the equipment can immediately generate an alarm. With the traditional approach, all batches since the last calibration (probably one year ago) would be subject to the investigation. In addition, many of the products processed in the compromised sterilizer could have already been administered to patients.
The ISPE Pharma 4.0™ Special Interest Group (SIG) launched its Pharma 4.0™ operating model, which describes the digital maturity of a company and the traceability of information. With the addition of self-calibration, traceability and trust of sensor-generated information about temperature are enhanced. If other process parameters could also self-calibrate, that would provide benefits for the process analytical technology concept and real-time release testing.
Conclusion
The study conducted using the sterilizer at Merck Healthcare building PH50 in Darmstadt, showed successful results concerning the implementation of a self-calibrating thermometer in sterilization processes. The overall process control was increased, which should be a main goal for any pharmaceutical company.
Some considerations regarding cost have been assessed. For a typical application, the return on investment should be reached after approximately 1.5 years, assuming all temperature sensors for one sterilizer are replaced with self-calibrating temperature sensors.
Important topics for future discussion include overall risk and the comparison of the batch-wise one -point calibration to the traditional approach. Opinions from regulatory representatives on the future outlook of this new process would be appreciated.


