Equipment Surfaces - Redefining Acceptable Conditions to Eliminate Unnecessary Maintenance

Although other industry publications have explored the effect of surface finish on biofilm formation, background data indicating that imperfections exceeding the American Society of Mechanical Engineers (ASME) Bioprocessing Equipment (BPE) standard are detrimental to chemical cleaning performance are lacking.1 This paper explores the experimental design used to define appropriate remediation criteria by evaluating when cleaning capability is affected by aging and/or chemical degradation of process contact surfaces.
- 1Arnold, J. W., and O. Suzuki. “E ects of Corrosive Treatment on Stainless Steel Surface Finishes and Bacterial Attachment.” Transactions of the ASAE 46, no. 6 (2003): 1595–602. https://doi.org/10.13031/2013.15622
Current Approach
In the pharmaceutical industry, 316L stainless steel (SS316L) equipment surface finishes are carefully controlled to ensure a high degree of quality in manufacturing operations. Standards such as those found in ASME BPE Part SF provide strict guidance relative to surface anomalies with the goal of enhancing cleaning capability and providing bioburden control. Imperfections in the surface finish may inhibit cleaning capability by providing voids in which process soils or microorganisms may become embedded. As such, specifications for imperfections like surface roughness, pit diameter, pit density, scratch depth, and scratch length are provided. Manufacturers adopt the acceptance criteria defined in the ASME codes and standards to aid in new equipment acceptance activities.
The surface finish specifications provided in ASME BPE are typically supplemented by other requirements for bioprocessing equipment. Standards defined in API 579/ASME FFS-1∗ and the National Board Inspection Codes define fitness for service as well as installation, inspection, and repair requirements for pressure vessels to ensure safe operation. Although these safety considerations are critical for the overall design program, this technical paper focuses on the importance of surface finish, including pits, scratches, and surface roughness, relative to the cleaning capability.
Relative to the anomalies (indications) defined in the ASME BPE. Part SF specifications, post-fabrication quality aspects such as dents and surface cracks are deemed not acceptable at any level and are avoidable in construction. Other anomalies associated with metallurgical aspects and artifacts (e.g., pits and surface inclusions) are allowed within detailed acceptance criteria, as they are technically unavoidable.
* A comprehensive consensus industry-recommended practice developed by the American Petroleum Institute and the American Society of Mechanical Engineers
| None accepted | Allowed within defined acceptance criteria |
|---|---|
| Dents | Pits (individual and clusters) |
| Nicks | Scratches |
| Surface cracks | Surface inclusions |
| Surface residuals | Fixture and finishing marks |
| Blistering | Orange peel |
| Porosity | Stringer indications |
| Weld slag (fittings, valves, vessels, components) |
Weld whitening |
| Weld slag (tubing) | |
| Cloudiness | |
| End grain effect | |
| Haze | |
| Variance in luster |
Unavoidable Wear Associated with Manufacturing
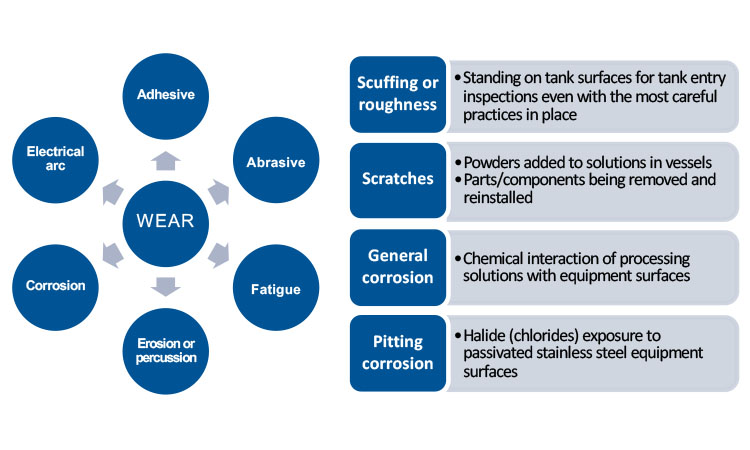
Upon acceptance, equipment is typically installed, released for commissioning and validation, and then released for use. Over its life span, the equipment will be used by production facilities for a wide variety of activities that can affect surface conditions. Good manufacturing, engineering, and maintenance practices minimize but never eliminate this inevitable wear. Manufacturing activities such as raw material/utility usage have the potential to induce abrasion and corrosion. Routine equipment setup and inspection can scratch surfaces as components are removed and installed. All of these activities produce unavoidable cumulative wear in the form of scratches, pits, and changes to the surface roughness (Figure 1). Rouge effects on cleaning efficiency and surface finishes have been studied in other references and are not included in this evaluation.3
Current Response to Wear
Manufacturing and maintenance personnel typically perform visual inspections of process contact surfaces to ensure compliant and problem-free operation (per ASME BPE definitions, process contact refers to all equipment that comes in contact with the designated product, either directly or indirectly). These inspections can occur after every clean-in-place (CIP) activity and/or as part of routine maintenance. Inspection provides the opportunity to identify anomalies on those surfaces.
Common anomalies are small in relation to the overall equipment surface area and many are difficult to view at distance on a highly reflective, mirror-like surface. The challenges associated with detecting these anomalies can lead to several problems in a manufacturing operation, including the following:
- Discerning whether an anomaly has been recently created or was a previously accepted artifact of construction. Are you remediating a construction artifact that was once accepted based on the ASME BPE criteria?
- Disruption of manufacturing operations. Remediation response can involve particulate-generating activities (e.g., grinding) within cleanroom areas. This can create production-schedule disruptions, and typically creates more nonuniformity of the surface condition.
- Assessing safety, identity, strength, quality, and purity (SISQP) impact on the biopharmaceutical product. Identifying any anomaly during inspection may indicate surface-cleaning issues. These should be evaluated to determine whether inadequate cleaning has affected (or has the potential to affect) the product.
Remediation can range from ignoring the issue (not recommended) to immediate action. An overly conservative approach that requires immediate remediation may produce production stoppages, more tank entries, and more process contact surface wear. This is a cycle worth breaking in favor of a risk-based approach that assesses anomalies in the context of SISQP impact and provides remediation pathways based on relative cleanability data, combined with other risk factors specific to a manufacturing site.
Acceptance criteria sensitive to SISQP impact are a key piece missing from this approach, however. The challenge is to determine criteria based on infection points of cleaning success across critical controlled anomaly dimensions. Infection points identify the critical dimensions of anomalies at which cleaning efficacy transitions from acceptable to nonacceptable performance. These infection points can be used to derive acceptance criteria that would not affect product SISQP, but would assure full cleanability of equipment surfaces.
Thinking Differently
A surface cleanability study to identify appropriate acceptance criteria for common anomalies was conceptualized with the following framework:
- Define typical surface anomalies and dimensional ranges
- Use a cross-section of soil types to evaluate effect on cleaning
- Use a cross-section of cleaning chemistries
- Identify true inflection points in cleaning degradation
Given the range of testing desired in this study, bench-scale testing was the only viable option to explore the targeted surface anomalies. This required development of methods for surface anomaly creation, soil identification and replication, cleaning agent selection, test fixture design, and measurement system selection to elucidate differences in cleaning capability that reflect at-scale conditions suitably.
- 2American Society of Mechanical Engineers. BPE-2016 Bioprocessing Equipment. 2016. See esp. chap. 5, part SF.
- 3Blitz, Thomas, Ernst Felber, Robert Haas, Birgit Lorsbach, Andreas Marjoram, Roland Merkofer, Tobias Mueller, Nathalie Schuleit, Marc Vernier, and Thomas Wellauer. “Test on Rouging and Experiences Dealing with Rouging in Pharmaceutical Production.” Pharmaceutical Engineering 35, no. 3 (May/June 2015): 41–42.
| Coupon | Variables | Fixed attributes | Method |
|---|---|---|---|
| Surface roughness |
20–150 microinches (µin), Ra | N/A | Sheet metal, grinding wheel |
| Pitting | 0.2–5.0 mm depth 1.2–5.0 mm diameter 1–5 density factor (0.04–3.33 aspect ratio) |
20 µin, Ra | Plate metal, milled cylindrical |
| Scratch | 0.2–5.0 mm depth | 50.8 mm length 1.0 mm width 45° angle |
Plate metal, cutting wheel |
| Micropitting | 40–2,600 micropits per coupon |
N/A | Electrochemically etched |
Surface Anomaly Creation
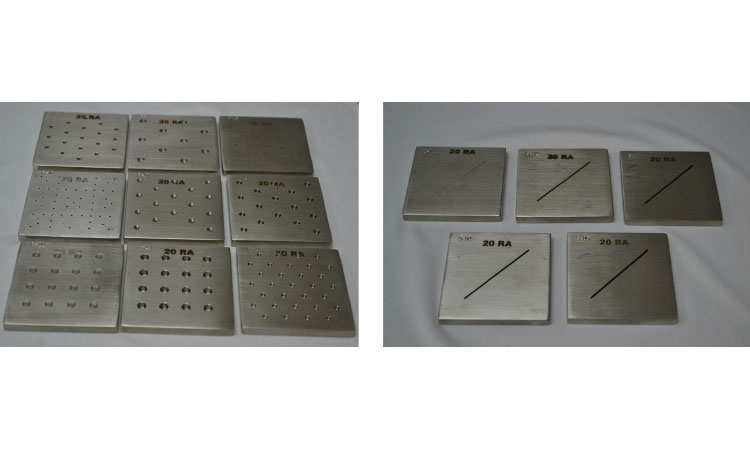
Test coupons comprised of SS316L were used as the basis for the study. These 2.5 inch × 2.5 inch coupons were constructed from sheet metal and plate metal.4 The coupons were machined to achieve the desired surface anomalies, including a range of surface roughness factors, pits, scratches, and micropits, as depicted in Figure 2 and Table B.
Dimensional boundaries were based on a review of all previously measured anomalies for a 2-year period at a large-scale biopharmaceutical manufacturing facility. Pit geometry was chosen to be cylindrical to represent worst-case cleaning turbulence compared to conical pits. Precise control of diameter and depth was crucial for statistical comparison; therefore, the coupons were not exposed to additional corrosion to avoid uncontrolled variability. The density factor (i.e., number of pits per unit area) was derived from the ASME BPE specification of a cumulative total diameter for pits within an inspection area (Table A). Diagonal scratch geometry provides both horizontal and vertical orientation components.
Soil Selection and Application
While process soils were utilized for addendum studies, most of the dataset utilized a surrogate soil to provide adequate resolution of data to generate inflection points. Many process soils pose little challenge to the cleaning system and, therefore, may provide poor statistical resolution between different test conditions. This is especially true of soils that may be removed sporadically in large pieces, which creates too much variability to quantify inflection points using continuous predictors. Selecting soils that dissolve in a more predictable fashion is necessary to generate inflection points.
To reconcile the need for process scalability with the desired study outcomes, two different studies were executed with different soils.
Primary Study: BSA Surrogate Soil
A surrogate soil composed of bovine serum albumin (BSA) and fluorescein was used as the primary material for the study. BSA was chosen because it is a representative proteinaceous soil with a removal rate that can be tuned through heat treatment to a beta-sheet conformation.5 The change in conformation creates a soil that dissolves steadily when exposed to cleaning agents, allowing relative removal rate to be adjusted up or down to minimize variability, and to gauge removal as a function of the surface attributes. Fluorescein, a molecule with the ability to fluoresce under ultraviolet (UV) light, was included as an additional detection method. The concentration of BSA and fluorescein in the mixture was optimized for suitable soiling weights and fluorescent detection, resulting in a 10% BSA and 0.011% fluorescein mixture.
Addendum Study: Process Soils
Process soil 1 was a solution from a monoclonal antibody production process mixed with fluorescein. Process soil 1 was the most challenging (worst-case) soil to clean from stainless steel within this manufacturing facility. Like the BSA surrogate, the fluorescein was added to include another detection mechanism.
Process soil 2 was a surrogate soil used to represent a known worst-case hydrophobic air–liquid interface cleaning challenge. Unlike the other soils, fluorescein was not added due to compatibility issues with the chemistry.
- 4Tuthill, Arthur H. “Stainless Steel: Surface Cleanliness.” Pharmaceutical Engineering 14, no. 6 (November/December 1994): 36–44.
- 5Su, Rongxin, Wei Qi, Zhimin He, Yubin Zhang, and Fengmin Jin. “Multilevel Structural Nature and Interactions of Bovine Serum Albumin During Heat-induced Aggregation Process.”Food Hydrocolloids22, no. 6 (August 2008): 995–1005. https://doi.org/10.1016/j.foodhyd.2007.05.021
While the range of surface anomalies was characterized with the BSA–fluorescein surrogate, the two process solutions were evaluated to ensure that the identified trends represented at-scale conditions.
With the different soils identified, a consistent soiling method had to be developed. Homogeneous distribution of soil over the coupon surface was important to ensure penetration into the various surface anomalies. The backs and edges of the test coupons were covered with contact paper and submerged in a 1,000 mL beaker containing the process soil mixture agitated at 200 RPM. After 5 minutes of exposure, the coupons were removed from the agitated solution and allowed to dry overnight with the surface imperfections facing upward. Once dry, the contact paper was removed carefully to avoid peeling the dried soil from the face of the coupons.
The dried BSA–fluorescein coupons were then heat-treated to induce the conformation of the protein. This caused the protein to denature and bound it more tightly to the coupon’s surface in a predictable fashion. The temperature for heat treatment was empirically determined to optimize the concurrent dissolution of BSA and fluorescein during cleaning. When applied to coupons without surface anomalies, treatment at 90°C for 60 minutes created a condition that allowed the mixture to be completely removed in a 5-minute cleaning cycle. Results from coupons with surface anomalies could then be normalized when using the same cleaning time.
The same submersion system was used for the process soils used in the addendum studies. While the coupons were dried overnight and the contact paper was removed prior to testing as before, they were not subjected to heat treatment.
Cleaning Chemistry Selection
Various chemical recipes using commercial alkaline detergents types CIP 100 and CIP 150 were used for the studies. An additional commercial surfactant CIP additive was also used. The first cleaning regimen of 1% CIP 100 at 60°C was chosen to perform the surrogate (BSA–fluorescein) anomaly studies to best represent standard caustic cleaning approaches throughout the industry.
The addendum studies utilized known successful cleaning regimens with the selected process soils:
- Process soil 1: 1.3% CIP 150 at 60°C
- Process soil 2: 5% CIP 100 + 5% CIP additive at 80°C
In addition, cleaning regimens used onsite for other soils were tested with process soil 1 to evaluate cleaning chemistry interactions with the soil and surface-anomaly combinations:
- 1% CIP 100 at 60°C
- 0.2N* NaOH at 20°C
- Purified water at 80°C
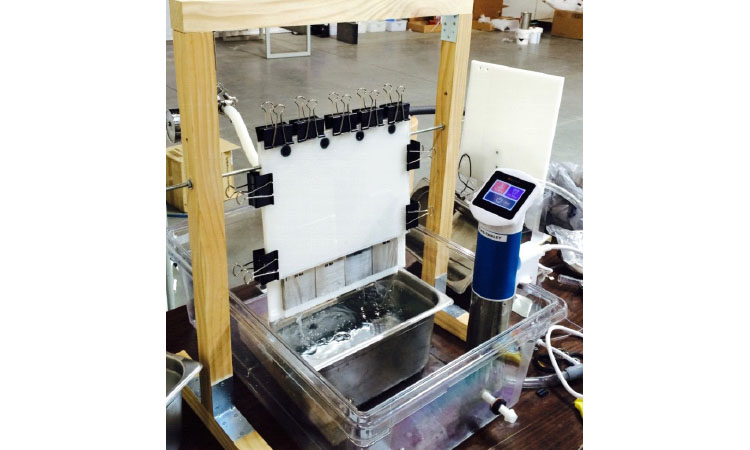
Figure 3 provides an example of the falling film fixture used in this experiment. A variable-speed centrifugal pump was used to control cascade flow rate across the faces of the coupons. The flow rate was set to yield a Reynolds number of 3,000. This mimicked a turbulent falling film at 60°C, representative of field conditions within a process vessel.6 Cleaning solution temperature was maintained using an immersion heater with proportional–integral–derivative control.
* Normality (N) is an expression of concentration as equivalents of solute per liter of solution. A 1 normal (1 N) solution of NaOH contains 1 mole per liter of hydroxide.
- 6Perry, Robert H., and Don. W. Green. Perry’s Chemical Engineers’ Handbook. 7th ed. New York: McGraw-Hill, 1997. See esp. chap. 6, pages 42–3.
| Surface imperfection | p values | |||
|---|---|---|---|---|
| Gravimetric (BSA) | Gravimetric (addendum) | TOC | ||
| Micropits | Density factor | 0.917 | ||
| Scratches | Depth | 0.000A | 0.369 | 0.637 |
| Cleaning agent | 0.642 | 0.000 | ||
| Depth × cleaning agent | 0.866 | 0.859 | ||
| Roughness | Ra | 0.135 | ||
| Pits | Density factor | Dropped | Dropped | Dropped |
| Pit depth | Dropped | 0.120 | Dropped | |
| Pit aspect ratio | 0.007 | Dropped | Dropped | |
| Density factor × pit depth | Dropped | Dropped | Dropped | |
| Density factor × pit aspect ratio | 0.000 | Dropped | Dropped | |
| Pit depth × pit aspect ratio | 0.000B | Dropped | Dropped | |
| Cleaning agent | 0.014C | 0.000D | ||
| Soil | Dropped | Dropped | ||
| R2 adjusted | 0.900 | 0.130 | 0.900 | |
| A Depth > 1.0 mm will trap residue B Diameter > 4.0 mm with depth > 2.6 mm will trap residue |
C Dominant variable D Dominant variable, CIP 100 had the lowest TOC |
|
||
Measurement System Selection
Three metrics were selected to characterize cleaning efficacy as a function of the different surface anomalies. The first was mass removal percentage. Mass measurement using an analytical balance provided a continuous dataset with a resolution of 0.3 mg that could be analyzed using regression tools. Test coupons could be measured prior to soiling, after soiling, and after cleaning to assess the relative removal of the soils from the surfaces. This gravimetric analysis was applied to all process soils in this study, as it is nonspecific.
Binary visual inspection methods were employed to complement the mass-removal percentage. This included inspection under both laboratory lighting and fluorescence to detect the fluorescein component. The presence of any residual soil was recorded as a failure, and the percentage of coupons failing visual inspection was used as an orthogonal measurement to mass-removal percentage. This provided a second independent metric to evaluate trends in the cleaning efficacy. Like the mass measurements, visual inspection could be applied universally to all soil types in this study without the need to develop specialized tools.
The final metric for the studies was total organic carbon (TOC) analysis of swab samples. This tool required a validated method that was transferred into the testing laboratory prior to use. While developed for process soil 1, TOC analysis provided a measurement of residual soil (down to < 1 μg/cm2). This continuous measurement, like gravimetric analysis, could be used in regression analyses to identify trends and significant variables that influence cleaning efficacy for the addendum study.
Experimental Approach
Cleaning time was empirically determined in screening tests to normalize the dataset against a control value. The control was defined as the time required to completely remove the various soils from an unmodified coupon with a 20 μin Ra finish using 1% CIP 100 at 60°C. Normalizing the data in this way minimized scale and soil comparability factors; this was crucial to ensuring the data were relevant to at-scale conditions. Cleaning times were found to be 5 minutes for the BSA surrogate, 2 minutes for process soil 1, and 30 minutes for process soil 2.
Soiled coupons were cleaned and then allowed to dry prior to measurement. For all studies, each set of experiments tested two coupons simultaneously. The order of coupon exposure in the testing system was randomized and performed with three replicate runs for each anomaly. The orientation of the coupons with respect to the cleaning agent flow was also randomized. One 20 μin Ra control coupon was included with each set of coupons soiled at a given time.
The control coupons were then pooled by soil type and averaged. Each test coupon with a surface anomaly was normalized to its respective average control.
Analysis
Regression methodology was used to analyze gravimetric results for the primary BSA surrogate and the two process soils. Regression analysis was also applied to the TOC results from addendum study 1. The aggregate results are represented in the table of p values (see Table C). The p value quantifies the strength of evidence against the null hypothesis.7 In this experimental design, the null hypothesis is that cleaning is unaffected by changes to the coupon surface characteristics. Thus, p values < 0.05 indicate that a particular variable likely influences the chemical cleaning capability. Conclusions on the cleaning inflection points are detailed in the following sections.
Micropitting with the primary BSA soil: Multiple regression methods were used to test the hypothesis that the normalized mass-removal percentage is a function of pit density. There was no significant (p > 0.05) effect of pit density on percent removal within the range tested. There were no visual failures when inspected under UV, indicating that no BSA–fluorescein soil remained on the coupons.
| Depth, mm | ||||||
|---|---|---|---|---|---|---|
| 0.2 | 1.2 | 2.6 | 4.0 | 5.0 | ||
| Diameter, mm |
1.2 | 0% | 0% | |||
| 2.6 | 0% | 0% | 0% | |||
| 4.0 | 0% | 50% | ||||
| 5.0 | 0% | 100% | 100% | |||
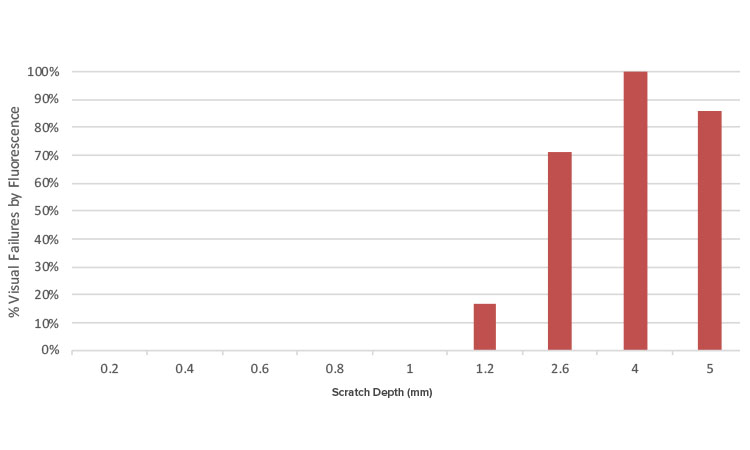
Scratches with the primary BSA soil: Multiple regression analyses were performed, and scratch depth was determined to be significant (p = 0.000). This indicates that as the depth increases, the removal percentage decreases. The fluorescence analysis also indicated a strong correlation between the increase in depth and lower residue removal (Figure 4). As the depth increased past 1.0 mm, failures during fluorescence inspection increased dramatically.
Roughness with the primary BSA soil: Linear regression was used to test the hypothesis that the normalized mass-removal percentage is a function of surface roughness. The p value is sufficiently large (p > 0.05) to conclude that removal percentage is not a function of surface roughness within the limits tested. Additionally, there were no visual failures under UV conditions.
Pitting with the primary BSA soil: The regression analyses carried out for pits used a backward stepwise regression method for use in variable reduction (Table C). Stepwise methods are a way of systematically reducing the number of variables in a model by “rolling” nonsignifficant variables into the error term, making it more sensitive to smaller effects. In this manner, it is possible to build a model that uses only statistically significant variables.
Executing the analysis in this fashion highlighted pit aspect ratio (p < 0.05), interaction of density factor and aspect ratio (p < 0.05), and interaction of pit depth and aspect ratio—the ratio of depth to diameter—(p < 0.05) as significant variables. This indicates that the primary variables of depth and diameter are the most impactful in predicting cleaning performance.
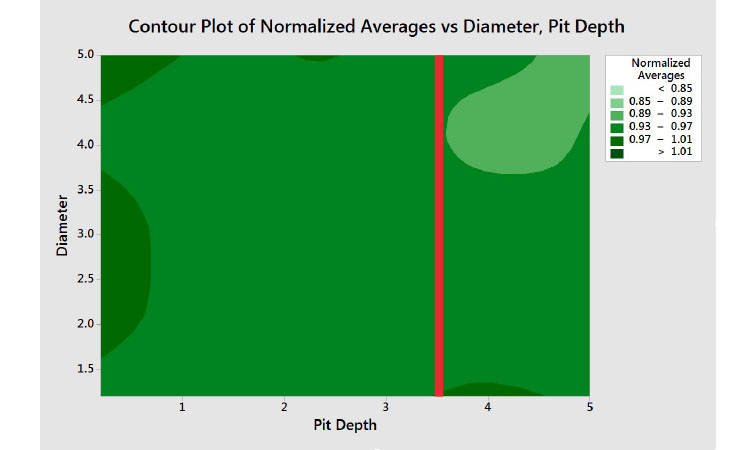
To highlight the area most affected by pitting, contour plots pit diameter and depth (Figure 5) provided indications of infection points in residue removal efficiency as a function of the significant variables. The light green areas in the graphs indicate areas with decreased removal efficiency.
Visual effects of fluorescence using UV lighting were captured as a percentage of coupons that failed visual inspection within a two-variable matrix consisting of depth and diameter (Table D).
Coupons were assigned a pass/fail value, and were considered to fail if any fluorescent residue was detected in any pit on the surface. The results in Figure 5 and Table D help identify the inflection points that affect cleaning capability more conclusively. Conclusions from visual inspection are more discrete than those drawn from the gravimetric analysis, but they point to the same general trends. Both diameter and depth impact cleanability. At depths ≤ 1.2 mm, diameter is no longer a factor in cleanability. Basing the specification exclusively on depth provides the fastest and most accurate field measurement (pit gauge) that diameter does not share. Adopting pitting evaluation criteria on this single variable provides a conservative threshold, yet remains a feasible approach to monitor conditions.
Addendum Study Analysis
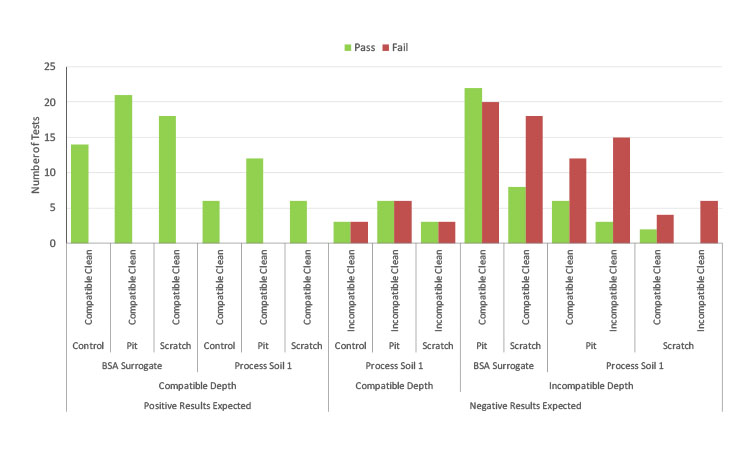
A small subset of scratch and pitting coupons straddling the inflection points were chosen for addendum studies with both process soil 1 and process soil 2. UV inspection results in Figure 6 show alignment with the inflection points for process soil 1. As the depth of pits and scratches exceeded the defined thresholds, visual failures were seen. This aligned with the predicted results derived from the primary study with the BSA surrogate. From the gravimetric analysis, scratch results did not indicate any significant variables when evaluating depth, cleaning agent, and soil. For pitting, cleaning agent was an overwhelming factor (p = 0.014), indicating the data were not normalized with soil selection. There was high gravimetric data variability for ineffective soil and cleaning agent combinations when considering both scratch and pitting datasets. As an example, recall that process soil 2 was a surrogate created to simulate a worst-case air–liquid interface condition.
A parallel study ultimately determined that process soil 2 was not representative of at-scale results, thus explaining its variability and warranting its exclusion from further analysis. TOC results also indicated that the cleaning agent was an overwhelming factor (p = 0.00) for both types of anomalies and likely confounded other factors. For example, purified water at 80°C failed typical TOC specifications on both sides of the inflection points when used to clean process soil 1. In retrospect, this was to be expected with a known ineffective soil and cleaning agent combination.
Excluding process soil 2, the BSA surrogate and addendum data were plotted against cleaning agent and soil combinations. A compatible cleaning agent was defined as one that was intended to remove the particular soil at scale. A compatible anomaly depth was defined as being below the identified inflection points determined by the BSA surrogate study. Results show a strong correlation between passing visual inspection results, compatible cleaning chemistry, and compatible pit and scratch depths predicted by the study. Conversely, more failures were seen with combinations of incompatible cleaning chemistries and pit and scratch depths. The same trends were seen with both the BSA surrogate and process soil 1, successfully bridging the two studies.
Conclusions
The goal of this study was to provide a strategy to derive the data necessary to support a risk-based visual inspection and maintenance program in operating plants. Driving simplicity and measurable criteria are essential when considering a visual inspection program. Considering all the data and observations from this case study, conclusions are summarized in Table E.
Note that combinations of anomalies were not evaluated in this study. Combining different anomalies both above and below inflection points to identify worst-case permutations could be a useful extension of the experimental design when evaluating applicability to the site’s maintenance program. In addition, it would be impossible to design a single experiment to evaluate every potential process soil between different biopharmaceutical manufacturers. The soils selected in this experiment were intended to represent common “worst-case” materials typically seen in biopharmaceutical operations. Each manufacturing site should assess the applicability to their operation and decide if repeated experiments are warranted using the methodology defined in this case study.
| Anomaly | Conclusions |
|---|---|
| Scratches | • The inflection point at which scratches affect cleaning is at depths > 1.0 mm • Scratch length and angle were irrelevant within the ranges tested in this study |
| Pits | • The inflection point where pitting impacts cleaning is at depths > 1.2 mm. • Multiple pits have no cumulative effect (density factor) and should therefore be removed as a visual inspection factor • Experience shows that pitting depth is a more repeatable, reliable, impactful, and relevant measurement than width |
| Micropitting | • Does not affect cleanability • May be monitored and remediated at the discretion of operations or maintenance • Tested to 2,600 micropits per inspection area |
| Roughness | • Surface finish is not impactful to cleanability up to 150 in Ra • Roughness > 150 µin Ra was not tested |
Recommendations
Using the study conclusions, a program can be developed to assess cleaning impact associated with surface anomalies. Below are some key considerations to help incorporate these conclusions into a visual inspection and maintenance program.
- Anomalies below the inflection limits have been shown to have no impact and are fully cleanable. This allows for a metered response when encountering anomalies below this range, which can be proactive (maintenance) instead of overly reactive.
- Anomalies at or beyond these inflection limits have been shown to have potential significance because they may not be cleanable. Investigation and tracking through the applicable quality system are appropriate, as is a more immediate remediation response.
- Anomaly response can range from monitoring the condition to delayed remediation to full immediate mechanical remediation (e.g., grind, weld, polish, electropolish).
- Additional safety factors should be considered to account for site- and application-specific conditions, capabilities, and risk factors. As an example, the percentage of the overall equipment surface area with identified anomalies, even if below the inflection limits, could be a risk factor that necessitates more immediate remediation.
Visual inspection program intervals need to be sensitive to anomaly creation due to invasiveness caused by things like vessel entry. The interval should be based on the likelihood/risk that impactful surface anomalies could be generated by routine long-term use and conditions. Technologies and approaches to limit vessel entry should also be considered if the risk is significant.
This study sought to address anomaly impact on cleaning operations within aging plants that were originally based on ASME BPE specifications. The intention is not to modify or relax any anomaly thresholds during construction of new equipment: That would require consideration of all aspects of new systems, especially corrosion resistance. New equipment must continue to meet the more conservative criteria laid out in ASME BPE.
This effort generated surface condition thresholds that can be used as a basis for a maintenance program in an aging plant.
- 7Dorey, Frederick. “In Brief: The P Value: What Is It and What Does It Tell You?”Clinical Orthopaedics and Related Research468, no. 8 (August 2010): 2297–8. https://doi.org/10.1007/s11999-010-1402-9


